Crunch. When I started Atkins, I thought I would go totally bonkers if I didn't get something crunchy and fast. Not just any crunch either, like from a crisp piece of celery or some roasted almonds. I mean cracker crisp. Junk food, processed, in a box, laden with ingredients I can't pronounce nor want to know from where they were derived, ready to go right now, salty, and cheesy crisp.
Through the message boards I scrolled and found numerous mentions of cheese crisps. It's easy they say, just nuke some cheese they say, just like Cheez-its they say... Ok, maybe I'm a little thrown by easy recipes and really just need things completely spelled out for me because for some reason, I was just not getting it. I had wonderful goopy greasy lovely cheese that made me very happy, but not crispy cheese crackers. Sometimes it would be sort of hard, but again, still not crisp. Tormented was my soul for the lack of mastering the art of microwaving cheese.
One day, something happened. I burned it. I don't know how, must have been distracted and put in the wrong time, I'm not sure, but it was burned. Of course this was a day where chewy greasy wads of cheese was actually what I had wanted, but whatd'ya know, they were crisp. I mean you can really snap those bad boys like a cracker crisp. Now the quest for a cracker had suddenly taken on a new spark. I was on to something!
Now, maybe you've been low-carbing for years and have perfected your cheese crisps a long time ago, but for me, this was like ground breaking material! For those of you who are new to low-carbing, or maybe are looking for a gluten free alternative to Cheez-its, or you're in desperate need of a snack right now and could care less about carbs (though you really should), I'm going to walk you through it.
First, start with about an ounce of hard cheese. My favorite is colby jack. I really love provolone, sharp cheddar and pepper jack as well. I wanted to make a little extra since my kids totally love my crisps too, so in this pic there's probably a bit more than an ounce.
Slice it into squares about a quarter of an inch thick. If you only have sliced cheese (but hard cheese, not processed cheese product), that's fine too! I cut those into wedges, for a standard round slice of cheese, maybe into 4 or 5 pieces. Now, lay them out in a circle on parchment paper. This is VERY important! Yes, you will ruin a plate if you just plop your cheese on it. Wax paper was not meant to be heated and will melt, and, well, I hope by now you know to leave the foil out of the microwave.
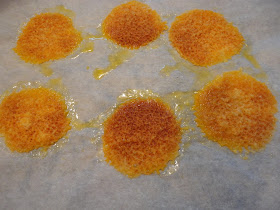
So, in a circle they go. Sprinkle them with some kosher salt or sea salt and put them in the microwave. You could get fancy and sprinkle them with a bunch of seasonings, but I found I like to season them up after they're nuked. I wouldn't put more than 5 or 6 pieces at a time, or they get crowded, melt together and take forever to crisp. Microwaves vary, so keep an eye on your crisps. I put mine in for a minute and 30 seconds. Some cheese needs a little more, some a little less... Keep an eye on it. Watch for it to start browning and then pull them out. This is what they look like right out of the microwave.
Let them cool off for a little bit, then enjoy! I love to whip up a little dip for these too by just sprinkling a bit of onion powder, dried dill and chives on a dollop of sour cream. Look at how well they hold that dip!


